Overview
Resume Customizer helps you turn one base resume into a tailored resume (and cover letter) for every job you apply to — without touching your formatting. It uses Claude to rewrite your content for each posting while preserving your PDF template's exact layout.
There are two core concepts:
- • Roles store a reusable resume template (imported from your PDF or HTML) plus role-specific instructions for Claude. Importing a resume PDF also runs a local template ATS check. You typically create one role per type of job you target.
- • Applications are saved from a role plus a specific job description. Each one tracks workflow status, Claude fit scores, local ATS parse results, and exported PDFs once you export.
1. Install & first launch
Grab the installer from the download page, then:
- • macOS: see macOS install help below — downloads are code-signed and notarized.
- • Windows: run the setup .exe (or the portable build). If SmartScreen appears, choose More info → Run anyway.
macOS install
- Download the .dmg for your Mac (Apple Silicon or Intel).
- Open the disk image and drag Resume Customizer into Applications.
- Eject the disk image, then open the app from Applications (double-click is fine).
Resume Customizer is distributed with a Developer ID signature and notarized by Apple, so macOS should open it normally after download — no Terminal workarounds required.
Why macOS asks for Keychain access
On first launch — or the first time you save your Anthropic API key — macOS may show a dialog asking whether Resume Customizer can access an item in your Keychain. This is expected.
The app stores your API key using Electron safeStorage, which encrypts the key and ties that encryption to your Mac's Keychain. Without Keychain access, the app cannot securely save or read your key between sessions.
- • What is stored: your Anthropic API key, encrypted — not your resume files or job descriptions.
- • Where it lives: an encrypted file in the app's private data folder; Keychain holds the encryption secret, not the key itself in plain text.
- • What to click: choose Allow or Always Allow so the app can remember your key. If you choose Deny, you'll need to re-enter the key each time or fix access in Keychain Access.
- • Network use: the key is sent only to Anthropic's API when you generate, score fit, refine, chat, or build interview prep notes — never to this website or any other service. ATS parse checks do not use the key.
On Windows, the same encryption uses the OS secure storage (DPAPI) instead of Keychain — you typically won't see an equivalent prompt. See the privacy page for more detail.
2. Add your Anthropic API key
Open Settings → API & updates and paste your Anthropic API key (it starts with sk-ant-). You can create a key in the Anthropic Console. The key is encrypted with Electron safeStorage and stored on your computer — on macOS that uses Keychain; on Windows, the OS secure storage.
When you save a key on macOS, you may see a Keychain access prompt. Why the app needs Keychain access explains what it is storing and what to click.
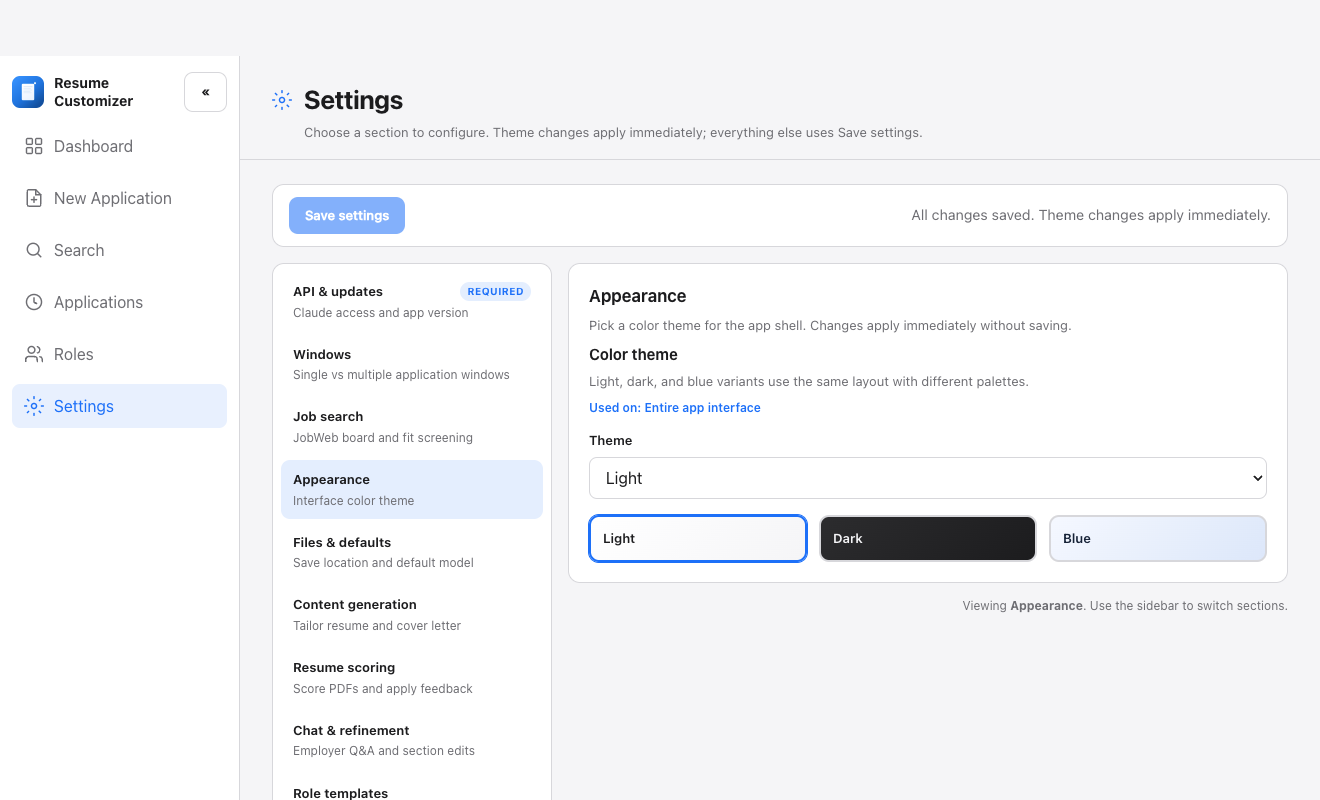
From the same Settings section you can also Review configured models (catch retired model IDs) and open the local API usage report. Theme, output folder, multi-window, and per-feature models/prompts live in other Settings sections — see Configure the app.
3. Single-window vs multi-window
By default the app uses a single main window: New Application and each application open as pages inside that shell. That keeps first-time setup simple.
When you want to multitask — compare two jobs side by side, keep chat open while editing another resume, or run the wizard while reviewing Search results — enable multi-window mode.
When multi-window is on
- • New Application opens in its own window.
- • Each application you open (including Chat) gets its own window so you can work on several at once.
- • Closing a child window does not quit the app — the main window stays open.
When multi-window is off
New Application and application detail navigate inside the main window (same as a typical single-document app).
What always stays in the main window
Dashboard, Search, Roles, Settings, and the Applications list stay in the main shell either way.
Always a separate window
The API usage report (Settings → API & updates → View usage report) always opens in its own utility window.
4. Configure the app
Settings is organized by feature. Theme and multi-window apply immediately; other changes need Save settings. Full prompt text for each AI feature is documented in the AI prompts reference.
Settings map
- • API & updates — Anthropic API key, review configured models, usage report, in-app updates.
- • Windows — single vs multi-window multitasking (details above).
- • Job search — default provider (JobWeb or Direct), optional extra company boards, JobWeb URL/token, default role, fit screening.
- • Appearance — Light, Dark, or Blue theme.
- • Files & defaults — output directory and default Claude model (fallback when a feature has no override).
- • Content generation — resume input format, generation model, system prompt.
- • Resume scoring — input format; evaluation, Improve with AI, and interview cheat sheet models/prompts.
- • Chat & refinement — Application Chat and section-refine models, prompts, and input formats.
- • Role templates — template insights model and system prompt (additional instructions are set on Roles → Analysis).
Resume input format
Several AI features let you choose how your resume is sent to Claude. Pick this under Content generation, Resume scoring, and Chat & refinement:
- • Structured text (default) — section IDs and plain text. Lowest token use; recommended for most work.
- • Full HTML — rendered template with inlined CSS. More context than structured text; still far cheaper than PDF.
- • PDF document — composes a PDF and attaches it. Highest cost; useful when the model should judge visual layout. Prefer structured text for Application Chat — chat resends resume context each turn.
How instructions stack
When generating or refining content, Claude sees layers of guidance:
- 1. Global system prompt for that feature (Settings).
- 2. Role-specific prompt (Roles) — generation.
- 3. Generation instructions and optional job notes on the application.
- 4. Per-run additional instructions — Improve with AI, interview cheat sheet, template insights.
- 5. Your chat or refine messages for that turn.
API usage & model health
- • View usage report — local estimates by feature and time range; you can clear history. Not Anthropic billing.
- • Review configured models — confirms the models saved in Settings still exist. At startup the app may warn if a configured model is retired or missing.
5. Dashboard
The Dashboard is your home screen after launch. It summarizes pipeline counts (not submitted, ready to submit, awaiting content, submitted, canceled), a getting-started checklist (API key → role template → first application), role performance and score summaries, shortcuts to saved searches, and recent applications.
Use New Application from the Dashboard (or the sidebar). With multi-window enabled, that opens a separate wizard window.
6. Create a role & import a template
Go to Roles and start Create role. Setup is a short wizard: Basics → Template → Done.
Configurable
- • Role-specific prompt — Roles wizard / Edit template (not Settings).
- • Template insights model & system prompt — Settings → Role templates.
- • Template insights additional instructions — Roles → Analysis (saved from that panel).
- • ATS parse check — local only; no model or API key.
Basics
Name the role (for example, "Senior Software Engineer") and optionally add a role-specific prompt — instructions Claude should follow when tailoring content for this kind of job (tone, emphasis, sections to highlight, constraints).
Template
Give the role a resume template using one of these options:
- • Import resume PDF (recommended) — analyzes the PDF, auto-detects editable sections, generates matching HTML/CSS for export, and runs a local template ATS check (no upload, no API cost).
- • Import HTML template — HTML/CSS with {{section-id}} placeholders. ATS checks need a resume PDF — import or re-analyze a PDF later for parseability scores.
- • Copy from existing role — reuse another role's resume template; the app re-runs the template ATS check after the copy.
Done
The Done step confirms the role and shows the template ATS check. Return to the roles list or open Fine-tune in editor.
After creation
- • Edit template — role prompt, layout, HTML/CSS; re-import or Re-analyze Resume PDF (refreshes layout and ATS); optional Import Cover Letter PDF; Preview Template; manual ATS re-check.
- • Analysis — template insights from past applications; apply selected recommendations (staged — save from Edit template).
- • Rename, duplicate, or delete roles from the list. Duplicating copies the template (including ATS results when present).
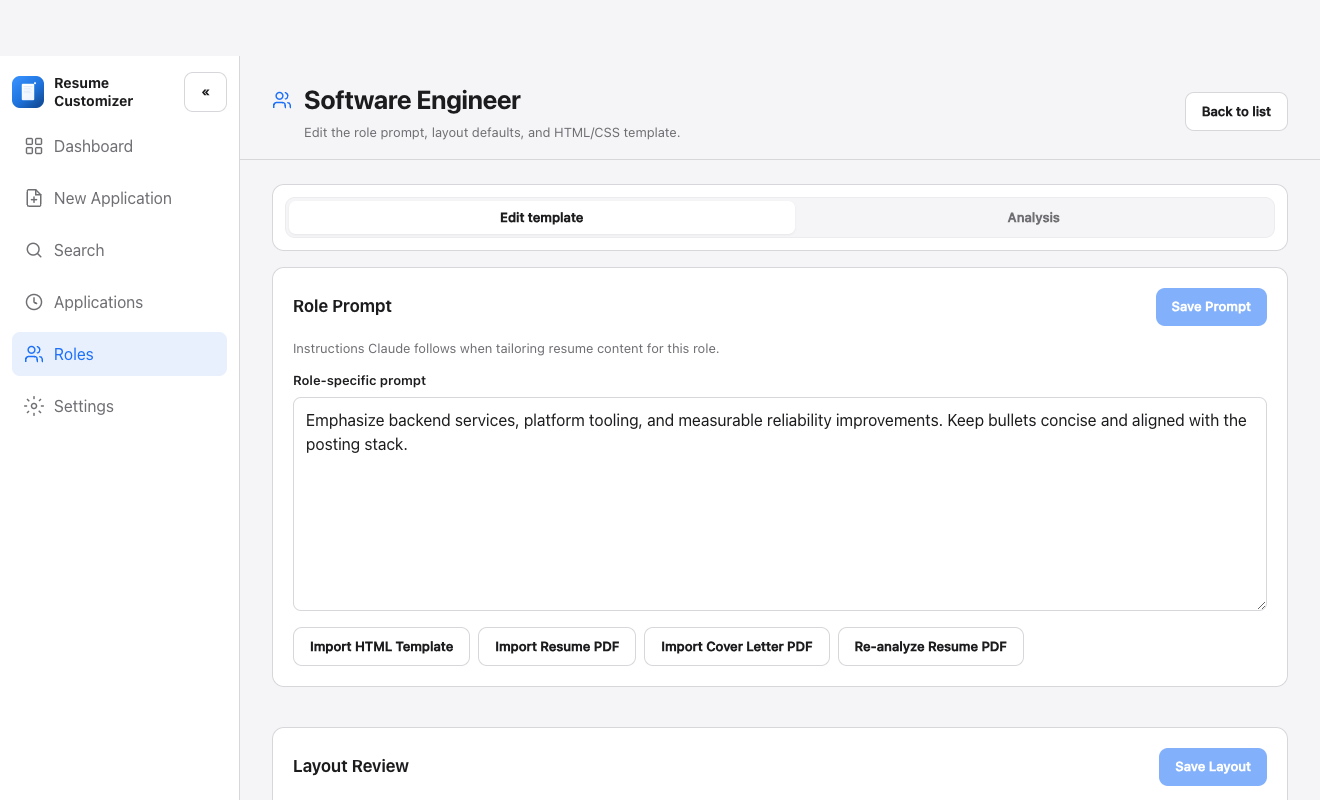
In Layout Review, check detected sections and defaults. HTML uses {{section-id}} placeholders — use Preview Template to confirm layout. Re-analyzing a PDF can change section IDs and replace customizations.
7. Create a new application
Click New Application for the five-step wizard: Role → Job Details → Generate → Review → Export. With multi-window enabled, the wizard opens in a separate window.
Configurable
- • Generation model, system prompt, input format — Settings → Content generation.
- • Role-specific prompt — from the selected role.
- • Generation instructions — Generate step (per application).
- • Job notes — Job Details step.
- • Score after generation — checkbox on Generate (saved preference).
- • Scoring / Improve / cheat sheet — Settings → Resume scoring (used on Review).
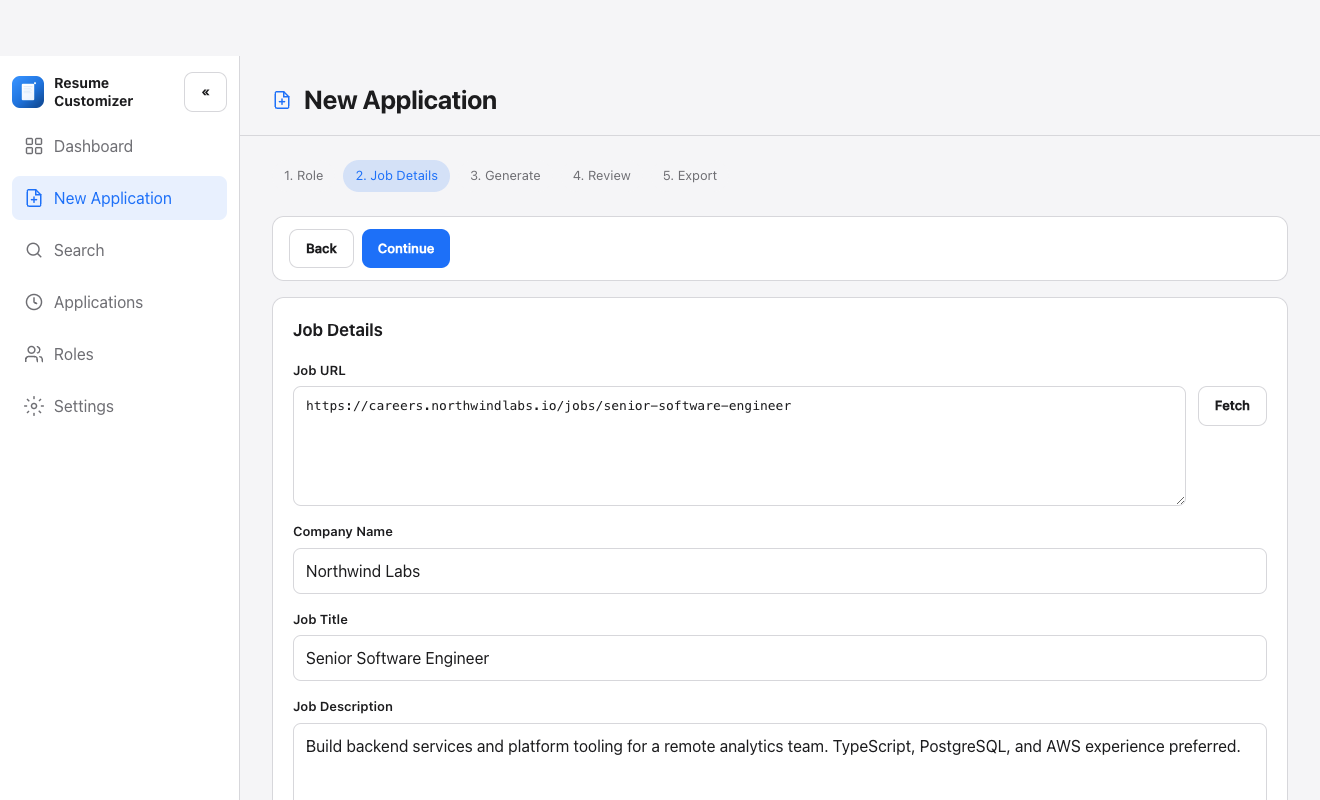
- 1. Role — choose the role whose template you want to use.
- 2. Job Details — paste a job URL and Fetch, or paste the description manually. Add optional notes for Claude.
- 3. Generate — optional generation instructions (extra guidance for this posting). Optionally enable Score resume after generation so Claude fit scoring runs automatically. Status becomes generated when content is saved.
- 4. Review — edit sections, score, Improve with AI, interview cheat sheet (next section).
- 5. Export — write PDFs and run the application ATS check.
8. Search jobs in bulk
The Search page is for high-volume hunting: save criteria, fetch listings into a local cache, triage fit, and batch-generate applications. You can pull from JobWeb (aggregated board) or Direct company career boards (Greenhouse, Lever, Ashby).
JobWeb vs Direct
- • JobWeb — faster aggregated board when it is reachable. May be unavailable if the host is down.
- • Direct — searches a built-in set of public Greenhouse / Lever / Ashby boards (plus any you add in Settings). Filter with the same title, keyword, location, salary, and work-mode fields as JobWeb — a company name is optional. Slower; more reliable when JobWeb is down.
- • Set the default under Settings → Job search; override per saved search.
- • Duplicate listings across boards (and vs existing applications) are merged so you import once. Prefer missing a merge over collapsing two different roles.
Configurable
- • Default provider & extra boards — Settings → Job search (optional careers URL / board token to expand Direct coverage).
- • JobWeb URL, auth token, default role — Settings → Job search.
- • Fit screening — enable, model, and system prompt in Settings → Job search (prompt details).
- • Per saved search — provider override, criteria, default role, fit screening on/off, auto-reject postings older than N days.
- • Batch generate uses Content generation (+ optional scoring) settings.
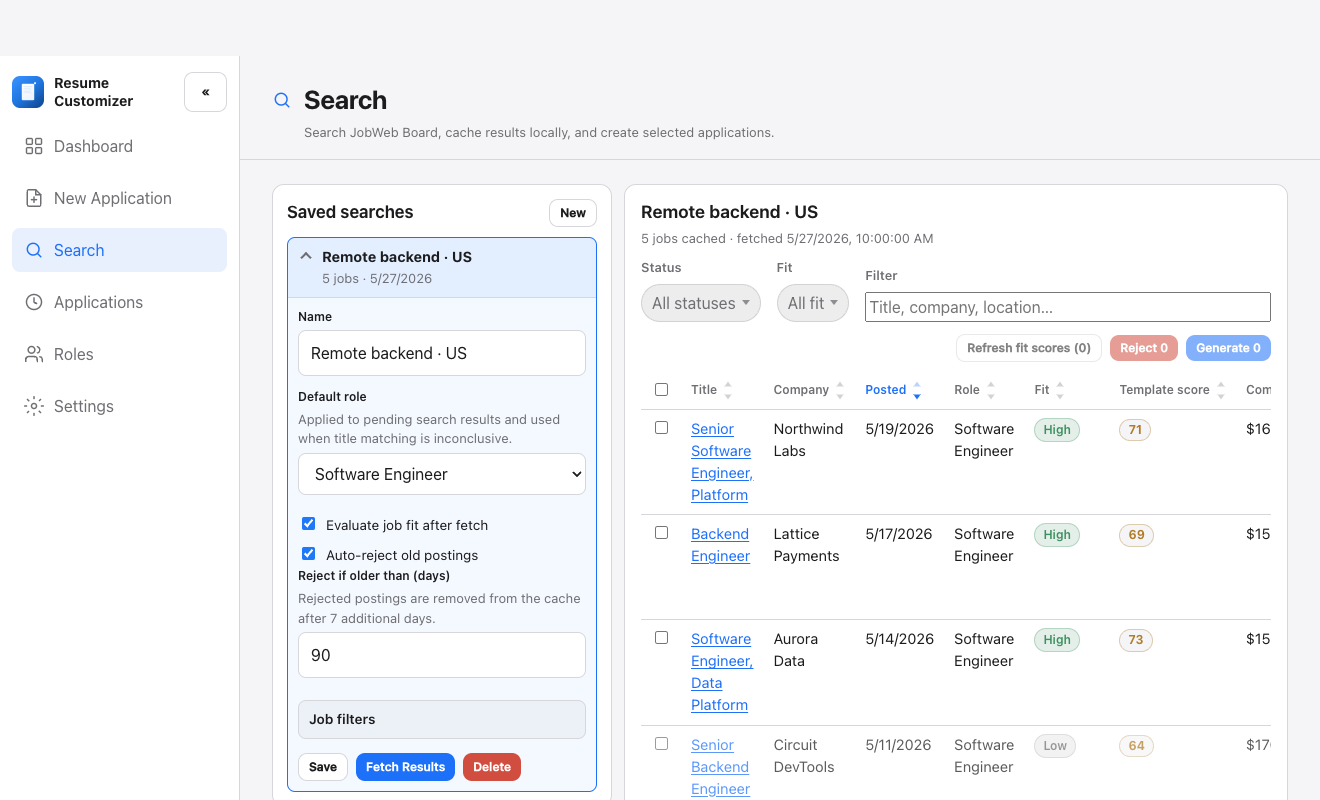
- 1. Create a saved search — name it; choose JobWeb or Direct (or inherit Settings); set title, keyword, location, regions, work mode, salary, and optional default role. Enable auto-reject for old postings if you want the cache cleaned by age. Direct does not require a company — optional boards in Settings only expand coverage.
- 2. Fetch results — downloads matching postings into a local cache (progress overlay; cancelable). Direct progress is per board; JobWeb is per page. Fit screening runs when enabled. Source badges show Greenhouse / Lever / Ashby / JobWeb; merged rows note other boards.
- 3. Triage — filter by review status (pending / duplicate / rejected / imported) and fit (high / medium / low / unevaluated). Reject listings you skip; re-evaluate fit when criteria or prompts change; open a posting in the browser.
- 4. Batch generate — select jobs and Generate. Progress covers description download, scoring when configured, and tailored content. Cancel stops remaining jobs; finished applications are kept. Existing applications matched by URL or company/title are skipped as duplicates.
9. Review, edit & score
On the Review step (or an application's Score / content panels), edit sections beside a live PDF preview. Claude fit scoring is separate from the local ATS parse check.
Configurable
- • Scoring — Settings → Resume scoring (model, system prompt, input format).
- • Improve with AI — Settings model/prompt; per-run model + additional instructions in the modal.
- • Interview cheat sheet — Settings model/prompt; per-run model + instructions in the modal.
- • Section refine — Settings → Chat & refinement; your instruction per section.
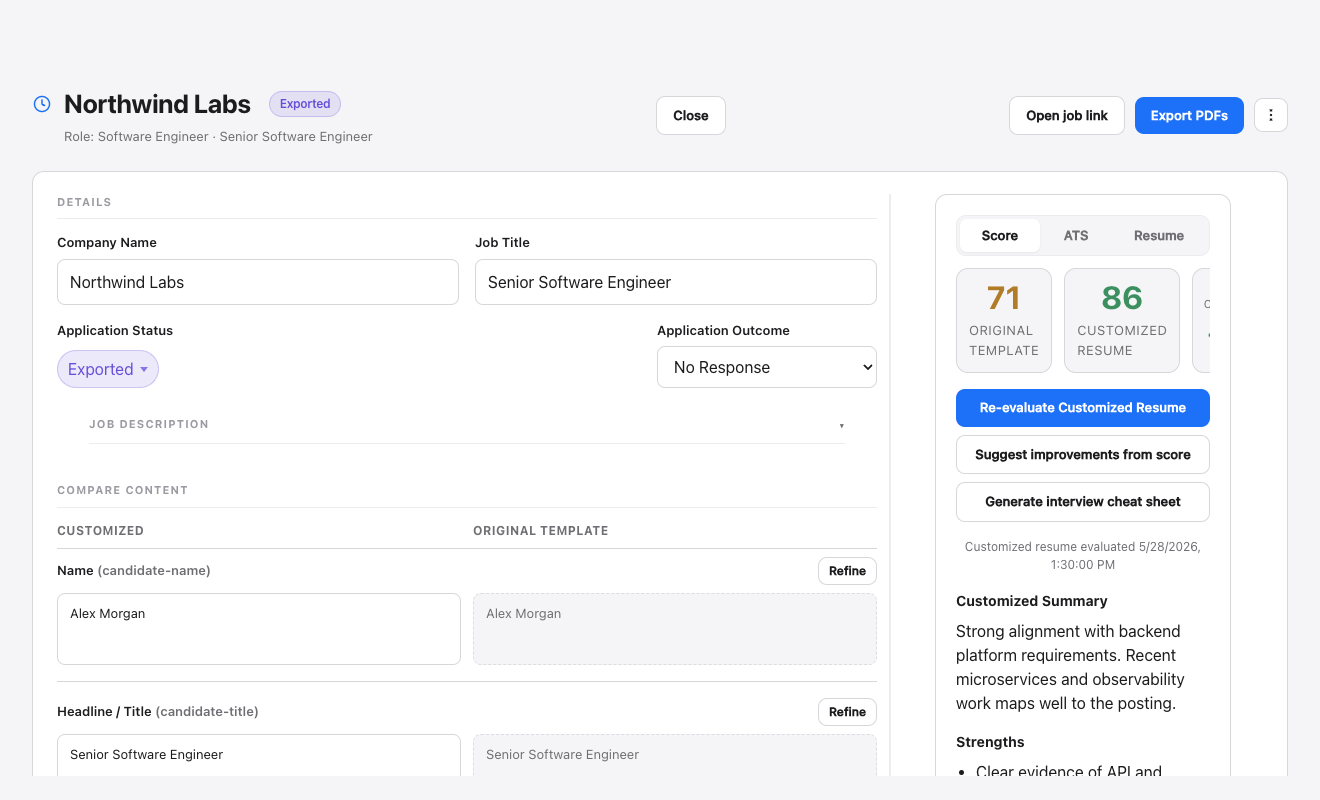
- • Compare baseline (template as-is) vs customized scores to see how much tailoring helped.
- • Read strengths, gaps, and recommendations. Scores go stale when you edit content after scoring — re-run before Improve or cheat sheet.
- • Improve with AI turns evaluation feedback into proposed section updates you can apply.
- • Interview cheat sheet — strengths to emphasize, gap responses, talking points, questions to ask; copy before a call.
- • Refine any section (or cover letter) with a short instruction and apply the rewrite.
10. Export & ATS parse check
Export writes polished PDFs that preserve your template's layout — resume and cover letter if present — into the company/role folder. Status becomes exported. Open the folder from Show in Finder / Explorer.
Every export runs a local ATS parse check on the tailored resume PDF (no upload, no API cost). The same class of check runs when you import a role template PDF; application checks also include job-description keyword coverage. Open the ATS tab to review:
- • Parseability — recovery of name, email, phone, Experience, Education, Skills, and related fields.
- • Missing from ATS output — critical and high-severity gaps.
- • What the ATS extracted — contact info, sections, skill tokens.
- • JD keyword coverage — matched vs missing terms (application exports only).
- • Platform-style scores — Workday-, Greenhouse-, Lever-, iCIMS-, and Taleo-like estimates, plus linear vs column-aware layout agreement.
PDF sync
After you edit content, the Applications list and detail view may show that PDFs are not exported or that content is newer than the PDF. Re-export to refresh files and the ATS check.
11. Manage applications
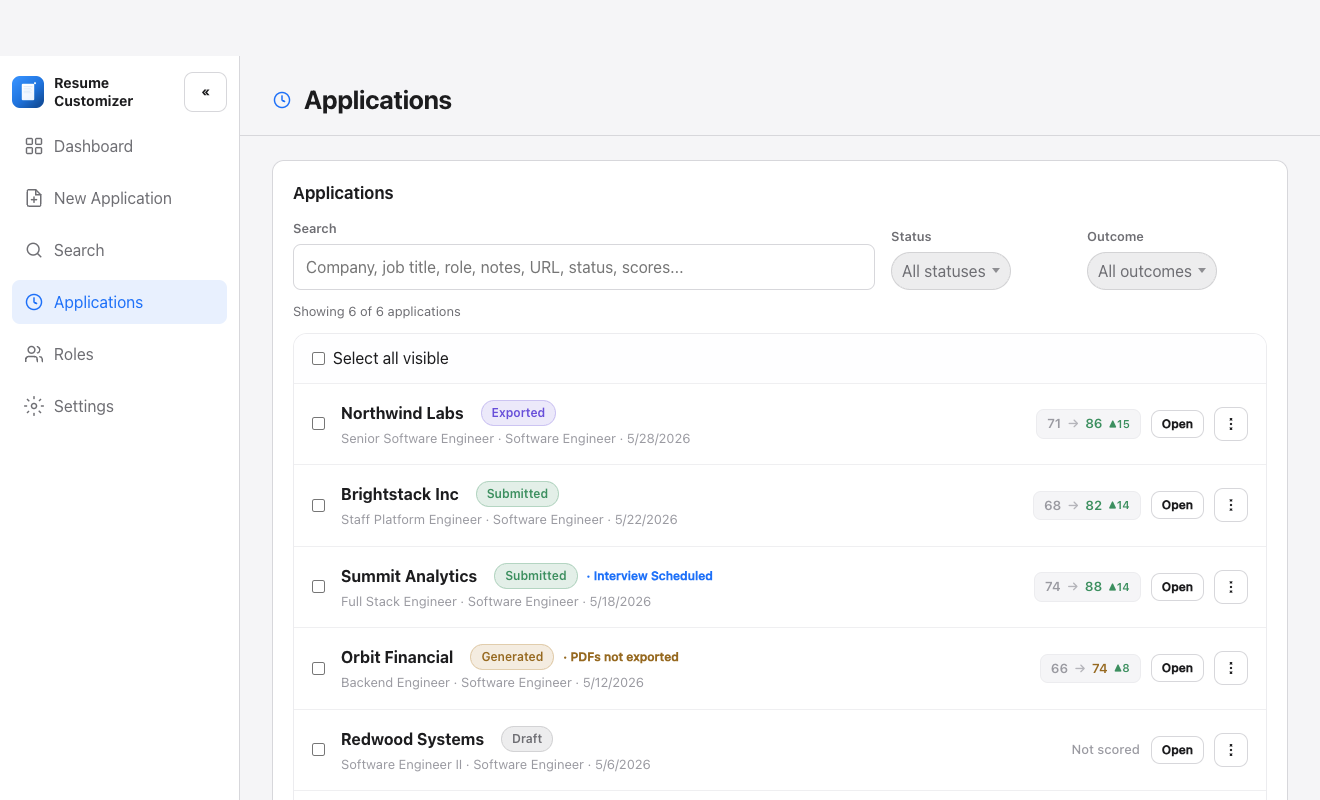
The Applications page lists every saved application. Search by company, role, title, status, or score. Filter by workflow status, use Ready to submit (generated or exported) or Not submitted, or filter by employer outcome. Multi-select for bulk status, bulk outcome, Evaluate scores (re-evaluates existing scores), or Export PDFs. Each row’s menu can evaluate/re-evaluate or export a single application.
Application status
Status is your workflow inside the app (separate from employer outcome). Most changes are automatic; you can also set status from the list or detail view.
- • Draft — folder saved without tailored content yet.
- • Selected — from Search/import before content exists; open, confirm role, Generate.
- • Generated — tailored content saved.
- • Exported — PDFs written to the folder.
- • Submitted — you marked it sent (records a submitted timestamp).
- • Canceled — not intending to submit; removed from active pipeline counts.
Employer outcome
Optional tracking after you apply. Defaults to No Response. Also: Rejected, Interview Scheduled.
Detail view
From any saved application you can:
- • Edit generation instructions and regenerate; compare base vs customized content; refine sections.
- • Use Preview, Score, ATS, and Cover letter tabs; Export PDFs; Show in Finder.
- • Chat — draft employer Q&A grounded in resume, cover letter, and JD (uses Settings → Chat & refinement). With multi-window on, chat opens in the application window.
- • Watch PDF sync badges and re-export when content drifts from the PDF.
12. Template analysis
As you accumulate applications for a role, Resume Customizer analyzes evaluation feedback and recommends template-level improvements — section defaults, role prompt additions, or layout notes — so future applications need fewer edits.
Configurable
- • Model & system prompt — Settings → Role templates.
- • Additional instructions — Roles → Analysis (saved preference from that panel).
- • Per-run model & instructions — override on the Analysis panel for one run.
- • Open a role's Analysis tab to run or revisit insights and apply selected recommendations (staged — save from Edit template).
- • The last report is saved per role.
- • The Dashboard shows role performance alongside pipeline counts.
13. Where your data lives
By default, applications and PDFs are stored locally (change under Settings → Files & defaults):
- • macOS: ~/Documents/ResumeCustomizer/
- • Windows: %USERPROFILE%\Documents\ResumeCustomizer\
Your API key is stored separately — encrypted via safeStorage, with Keychain (macOS) or Windows secure storage protecting the encryption secret. See Keychain access (macOS) and the privacy page.